Edge Jointing Veneer
Edge Jointing Veneer If you are new to veneering, I suggest you read the documents on selecting and cutting veneer back on my homepage before you read this document. It will give you a better idea why many standard veneers have to be edge jointed. There are a number of ways to obtain a good, tight joint that will be virtually invisible and will not lift or pull apart. While the following method may not be the quickest or most practical, I have always had great success with it.
If you are going to work with narrow sheets of veneer that have to be jointed together, make sure that you purchase the sheets in consecutive order as they were cut from the log this way the grain pattern and figure will match when you join the pieces together.
Book Matching is one of the most attractive methods of jointing pieces of veneer together. This method is also called a two piece match and the two consecutive pieces to be jointed, will appear to be mirror images of each other. start by laying two consecutive pieces of veneer side by side. Open them in book fashion and inspect the pieces for quality, defects and if the two combined pieces will be large enough to cover the surface you will be working on. The next step is to joint the two pieces together, but first, you must cut straight inside edges for a perfectly tight joint.
Homemade Jointing Jig
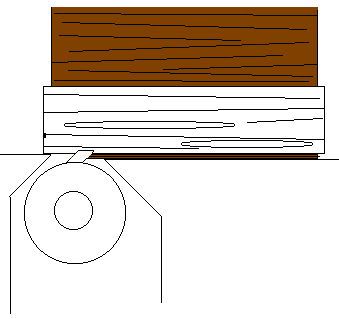
This jig can be made of two pieces of hardwood each piece approx. 6 inches wide,1 inch thick and about 4 inches longer than the length of the two pieces of veneer you will be jointing. Clamp the two pieces of hardwood together and about 1 inch in from each end drill a 1/4" hole through both pieces centered on the width of the boards (3"). Next, Place 1/4" x 2 1/2" carriage bolts through the holes and add washers and wing nuts to the other side to hold the two boards together. Now remove the clamps. Tighten up the wing nuts so the boards are held tightly together. Next, choose on side and either run this side over a jointer, or use a hand plane to joint the two edges together. Place an x mark on the side of the two jointed edges.
Jointing The Veneer

Take the two pieces of veneer to be jointed and insert them into the jig. Make sure the two edges that are to be jointed are just slightly projecting out of the side of the jig that you jointed with your hand plane or jointer. Tighten up the carriage bolts to hold the veneer tightly in the jig. You can now use a hand plane set at a VERY SLIGHT CUT and run it across the edges of the veneer. When the veneer is flush and cannot be felt projecting out of the top edges of the jig, the jointing is complete. You can also take the jig and run it over a stationery jointer. Just make sure the jointer table is set to remove very little stock. after a few successive passes, the jointer should be removing some of the stock on the jig, once this happens, you will know that the veneer edges have been jointed flush.

Taping The Joint
Lay the two pieces of jointed veneer on a workboard with jointed edges together. MAKE SURE THE FACE SIDE OF EACH PIECE IS UP. To insure a tight joint, use veneer pins (these are similar to push pins used in corkboard to hold up paper messages). Drive the pins into both pieces about one inch away from the joint line. Make sure the pins are slanted toward the joint to bring the two edges tightly together. Don't worry about pinholes, once the veneer is glued down, they are virtually invisible, and if needed can easily be filled later. Now cut a piece of veneer tape slightly longer than the length of the joint. The tape will be applied to the face side and will be removed after the veneer has been glued down. Moisten the side of the tape that has the gum adhesive on it by lightly running it over a damp sponge. Next, place the tape over the center of the joint and press it down the entire length of the joint. Remove the veneer pins and use a rubber or hardwood roller to insure the tape is firmly applied to the surface. After the veneer has been glued down, the veneer tape may be removed by lightly dampening with a sponge dampened with water and peeling off the tape. Once the tape has been removed, let any gum adhesive residue dry completely and then scrape or sand the remainder of the residue off. It will turn to powder and come off easily. If you try to sand while the residue is still damp, it will be pushed down into the pores of the wood and create a gummy mess. After jointing, the veneer is ready to be glued down to its surface.

|
|
Return to Table of Contents CLICK HERE

Return To Sal Marino's Homepage
