Marbleizing
By Sal Marino
![]()
Faux (pronounced foe) finishing is the art of painting to create the illusion of real materials like marble,granite, woodgrain and wood tones. Traditionally, faux finishing was done by experienced finishers or craftsmen that learned the techniques mostly from family members. The techniques and materials were handed down from generation to generation. Special materials like turkey feathers, graining combs, natural sea sponges and mixtures of paints and varnishes (to make the glazes) were used to accomplish the job. Many of these techniques and formulas were guarded closely and not shared with other craftsmen. Today, even the amateur or house owner can achieve great results using either a kit bought at a local paint store or modern paints (like latex) and a few household items.
The technique I will describe here has been developed over a period of a few years and
a lot of experimentation on my end. The tools and materials are simple:
1 plastic plate, 1 fine artist's brush, 1 new kitchen sponge, a few foam brushes, 4 small
plastic squeeze bottles, 4 colors of latex paints, Blend and Glaze glazing liquid and a
few cups of water.
Step 1. Surface Preparation
A completely sealed surface is important for successful faux finishing. Start by filling all cracks holes, dents, etc. with a wood filler. I usually use Durham's Rock Hard Wood Putty. This is a powder that you mix with water to create a putty that dries hard and does not crack. Once the voids are filled, sand lightly to level the putty. Next, application of at least 2 sealer coats is a must. You can use either a thin coat of 3 lb. cut white shellac or a thin coat of water based sealer or water based finish. I usually apply 2 coats and let the sealer coats dry overnight then scuff sand lightly. After sanding, make sure to wipe off all the dust.

Step 2. Choosing The Colors
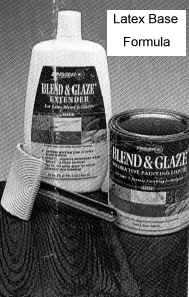
One of the best advantages of this technique is that you can use standard latex paints available at your local paint dealer. The easiest way to choose colors is by using the take home color strips available at a local paint store. Since the process of marbleizing is one that consists of layering different translucent colors over a base coat, you should choose colors that are in the same family to achieve the best results. Color strips are usually arranged in shades from light to dark. I usually choose a light color for my base coat. My glaze colors are usually a few shades darker than the base coat, but for a softer look, you can reverse this by selecting a dark base coat and making the glazing colors a few shades lighter. This reverse process will produce a look similar to the background of this page. The glazing colors will be mixed with a product called Blend and Glaze. The Blend and Glaze will reduce the latex paint giving it the proper consistency and making it translucent enough so the basecoat will slightly show through the glazing colors, thus producing the proper effect. The Blend and Glaze is white in color, so when choosing the glazing colors, pick deeper colors than first desired since the color of the paints will be lighter once mixed with the Blend and Glaze.
Step 3. Applying The Basecoat
Using a foam brush, apply a base coat of any interior latex satin or semi-gloss paint in the color of your choice. If the surface appears to be soaking in the paint, even though it was sealed first, wait about 1 hour and apply a second coat of the basecoat coat. Let this dry at least overnight.
Step 4. Preparing The Glazing Colors
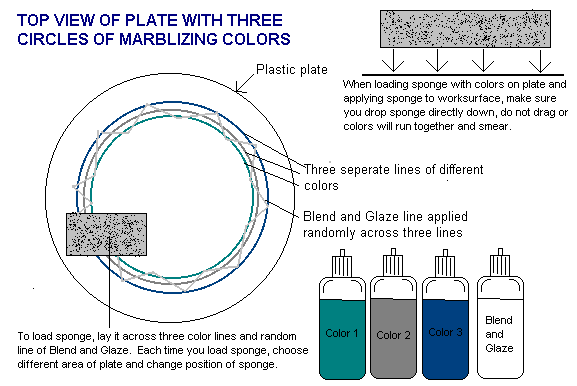
Use separate plastic open mouth jars or deep dishes to mix each latex glazing color with the Blend and Glaze liquid. Mix equal parts (1 to 1 ratio) of the latex paint (glazing color) and Blend and Glaze Liquid. Mix well, if you want the color to be more translucent, add more Blend and Glaze, if you want it more opaque, add more glazing color. Once the individual colors have been mixed, transfer each color into a separate small plastic squeeze bottle. See drawing. You can usually purchase these bottles at art supply stores, craft stores or home centers. The squeeze bottle should have a small spout that will enable you to squeeze out a thin line of paint. Also, fill one of the bottles with some of the Blend and Glaze liquid. Make sure you mix enough of each color to last you the whole job.
Next, you will need either a plastic or Styrofoam plate (the disposable type). Carefully, squeeze out one circular line of each color into the plate. Lay one color next to the other (around the inside of the plate) so they almost touch each other. Now, squeeze out a line of Blend and Glaze across the top of all the lines of glazing colors. This line should zig zag across the glazing colors around the plate. See drawing.

Step 5. Do The Marbleizing
Now you will need a new household sponge and a deep dish filled with water. Soak the sponge in the water and then ring out the sponge until it is almost dry. Next, using your fingernails or a tweezers, pluck out some small pieces of the sponge in random spots on both sides. This will help to produce a more realistic marble pattern. Once this is done, soak the sponge once more and this time squeeze it out until it is as dry as possible. To load the sponge, lay it across the glazing colors and random (zig zag line) of Blend and Glaze liquid. See Drawing. Each time you need to load the sponge, choose a different area of the plate and change the position (angle) of the sponge. Drop the sponge directly down over the lines of color. Do not drag the sponge or the colors will run together and smear. Starting in one corner of the workpiece, gently drop the sponge directly down on to the surface and lift it straight up making sure not to move the sponge across the work surface. As mentioned above, this will cause the colors to run together and smear. Continue the application across the worksurface. With every pass, change the position of the sponge as it contacts the surface, this way the pattern stays random and looks natural. Re-laod the sponge every 3 or 4 drops. Remember to use a different area of the plate when you re-load. Eventually, (after several times you re-load) the colors will start to run together. Once this starts to happen, wash out the sponge in water and once again squeeze it out, then re-load and continue. The effect you obtain will depend on how much of the surface you cover. Experiment to see what type of marbleized effect you like. One you are done, let the workpiece dry overnight.
Step 6. Painting In The Veins
The veins are applied with an artist's brush. Some people use a feather, but I was never able to get the hang of using one. Use a very fine sable brush with a small pointed tip. I usually use the lightest of the three glazing colors for the vein, but you can choose a different color if you wish. Once again, experiment here. Squeeze a small line of the glazing color on a plate and then squeeze a small line of the Blend and Glaze liquid next to it. Now, dip the brush in the glazing color and then into a little of the Blend and Glaze. Hold the brush between index finger and thumb and starting from one end of the workpiece, move the brush across the surface rolling and twisting it to create irregular lines. If you examine veins in a piece of real marble you will notice that they appear more translucent in some spots than in others. You can achieve this by using the spot on the brush that more Blend and Glaze than glazing color. This is why I do not mix the two together and load the brush separately with each. By rolling the brush you are able to use the area with either more of the glazing color or Blend and Glaze. Also, veins in real marble never run perpendicular to each other, they usually run somewhat parallel and branch out in some areas. It's best to study some real marble and try to produce its vein pattern. Personally, I find that too many veins makes the piece look unreal. I only paint in a few veins in each piece. Once the veins are done, let the piece dry overnight.
Step 7. Applying A Protective Finish
The last step is to apply a couple coats of protective finish. I have found that a water based polyurethane works well because it will not change the color of your finished piece the way an oil based varnish or poly will. The one I most often use is a product called Constantine's Aqua Wood Glo. This is a satin finish that is easy to apply with either spray or brush. I use a foam brush for application. Apply the first coat. Do not do a lot of brushing. Just get it on the surface and take one light pass with the tip of the brush to level the finish. The more brushing you do the more bubbles you will create. Let this dry 2 to 3 hours, sand lightly with 400 grit paper, wipe off the dust and then apply a second coat. Let dry at least 3 days for it to cure. If you feel more than 2 coats are necessary, you can apply additional coats. Make sure you do not apply more than 3 coats per day and then let the finish dry at least 3 days before use.
If you have any other questions, please feel free to e-mail me. All materials (except latex paints) can be purchased from Constantine's.
Return to Table of Contents CLICK HERE
Return To Sal Marino's Homepage
|
|
